
PiCom help guide
How to set up PiCom, choose a communicator, pick an access method, edit buttons and share boards. Menus can differ slightly between versions and devices.
Starting PiCom
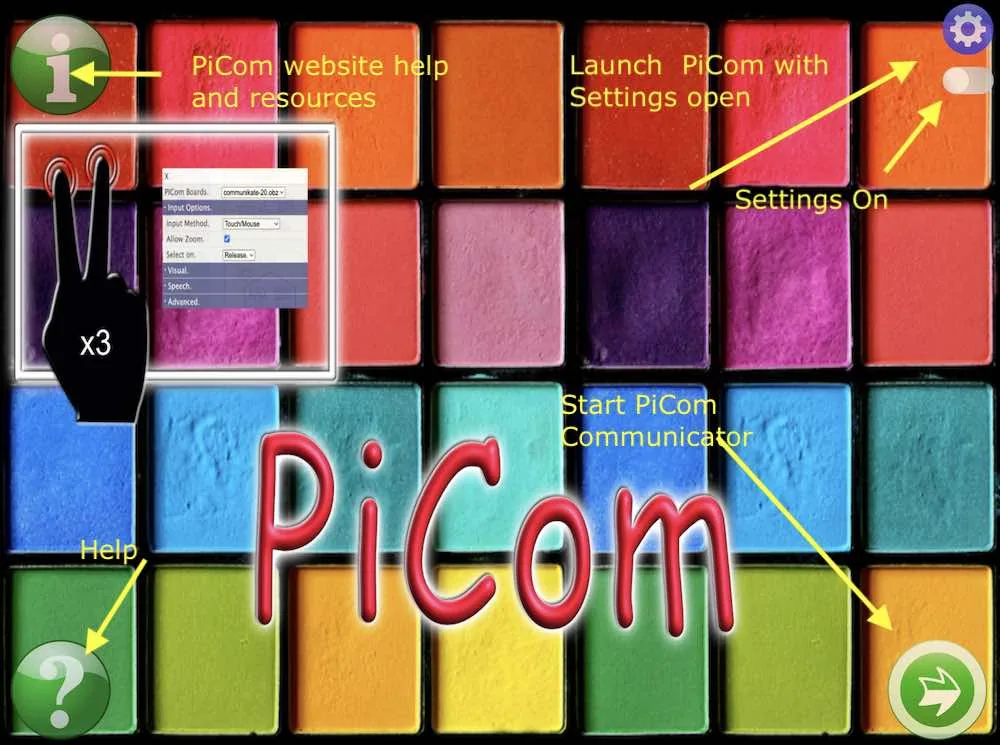
When you open PiCom, you see the PiCom home screen first. From here you can:
- start the communicator full screen with the green Go button
- start with the Settings screen open, for this session only
- read the built-in help text
- open this website for detailed help, videos and symbols
Opening Settings
PiCom is a communicator, so the Settings button is hidden once a board is running. This stops the user opening Settings by mistake.
The easiest way in is to tap Settings on the home screen when you start PiCom. There is a switch there to keep the Settings button visible every time PiCom starts.
While a board is running, you can open Settings in any of these ways:
| Device | How to open Settings |
|---|---|
| Mouse | Right-click three times on the top-left button of the board |
| Keyboard | Press Shift + S |
| Touch screen | Tap three times with two fingers on the top-left button of the board |
To hide the Settings button again, go to the main Settings tab, open Advanced, and tick Hide Settings button.
Settings has three tabs: the main settings, the board settings, and the button editor. The sections below follow that order.
Communicator templates
PiCom opens and creates communicators in the Open Board Format (.obf and .obz files). It comes with a range of published communicators from the Open Board Format community, which you can use straight away.
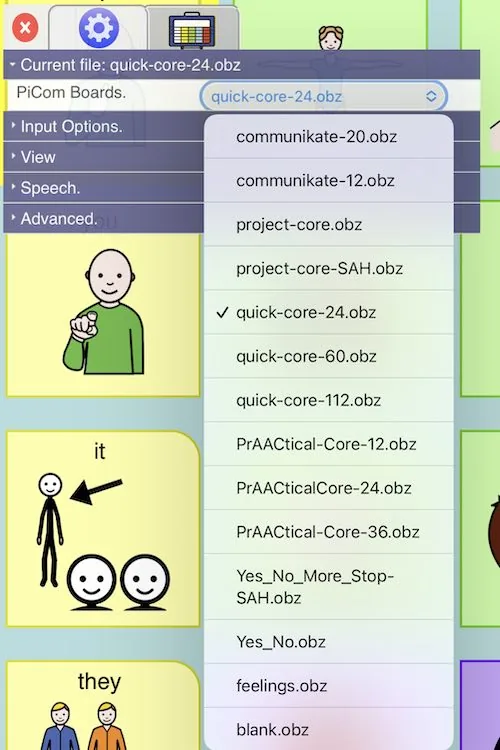
Choose a communicator from the PiCom Boards drop-down on the main Settings tab. The licences of the included boards let anyone modify and extend them and use them in print or digital form, in any app that supports the Open Board Format. See the licence page for details of each board.
You can also import, export and share boards. See Import, export and share.
Input methods
The Input option on the main Settings tab controls how the user selects buttons. Only the settings that apply to the chosen method are shown.
- Touch or mouse
- Touch a button, or point and click with a mouse. Pinch to zoom and move around the board quickly if Allow zoom is on.
- Touchpad
- An on-screen touchpad appears at each end of the message bar, for users with a very small range of movement. Put the toolbar at the bottom of the screen for this. The touchpad works either as an absolute map of the board, where moving around the pad selects different buttons, or as a joystick, where the eight outer squares of a 3×3 grid move in that direction and the centre square selects.
- Analogue joystick
- Move around the board with a standard Xbox-style game controller. It works well with the Xbox Adaptive Controller.
- Cursor keys or D-pad
- Move around the board with the keyboard arrow keys or a game controller's D-pad.
- Mouse wheel
- Scroll the mouse wheel to move around the board, either by row and column scanning or one button at a time. Click the wheel or use any switch to select.
- Switches
- Scan the board with one or two switches. See Switches and devices.
- Face control
- Available on some devices. PiCom asks to use the camera and shows a pointer that follows head movement. Select by hovering or with a switch. Face control with expressions also selects when the user opens their mouth, smiles or raises their eyebrows. How well it works depends on the camera, lighting, setup and the device's processing power.
Input settings
- Select on
- Select when a touch, button, key or switch is pressed, when it is released, or automatically after hovering on a button.
- Accept timer
- How long a switch, key or D-pad must be held before it counts. Useful for users who press accidentally.
- Hover timer
- How long the user must rest on a button before it is selected automatically.
- Touchpad size
- The size of the on-screen touchpad, when that input is chosen.
- Speed
- How quickly PiCom scans or repeats. For some methods, 0 turns auto-repeat off.
- Allow zoom
- For touch and mouse only. Lets the user zoom with a pinch and pan with two fingers. The toolbar stays in place, unzoomed, while you move around. This makes very large boards practical.
Switches and devices
PiCom recognises these as switches automatically, so there is nothing to set up beyond connecting the device:
- mouse buttons
- the keyboard keys Space, Enter, 1, 2, 3 and 4, which most Bluetooth and USB switch interfaces send
- Xbox controller buttons: switch 1 is A or pressing the joystick, and switch 2 is B
When switch input is on, PiCom also shows on-screen switches beside the message bar.
Switch modes
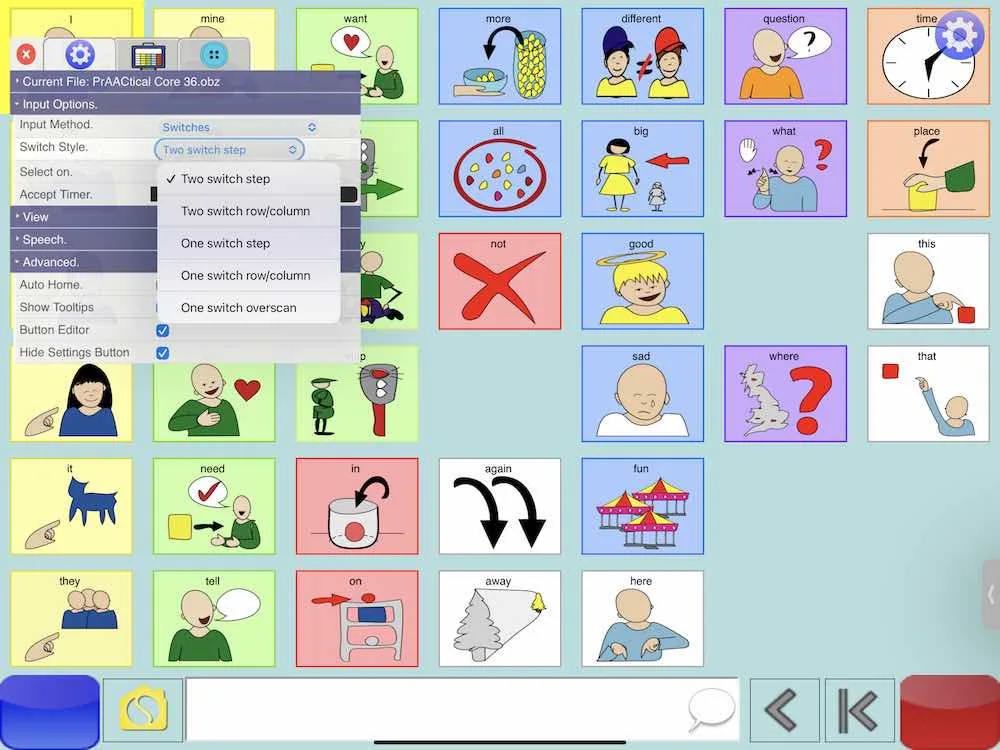
- Two-switch step
- One switch moves forward one button at a time. The other selects the current button.
- Two-switch row/column
- The first switch moves down the rows and the second chooses a row. The first switch then moves along that row and the second selects the button.
- One-switch step
- PiCom moves from button to button automatically at the chosen speed. Press the switch to select.
- One-switch row/column
- PiCom scans the rows automatically. Press the switch to choose a row, then again to select a button as PiCom scans along it.
- One-switch overscan
- PiCom moves quickly through the buttons. Press the switch and it moves back more slowly. Press again to select.
Switch and controller hardware
Windows, Chromebook, Android, iPad and Mac all support Bluetooth Xbox controllers, including the accessible Xbox Adaptive Controller. These work well with PiCom. Other options include:
Xbox Adaptive Controller (Microsoft)
Logitech G Adaptive Gaming Kit, add-on switches for the Adaptive Controller
RJ Cooper Bluetooth switches, switch interface and button box
AbleNet Blue2 Bluetooth switch
Switch access for our other apps is covered on the Sensory App House switch access page.
View settings
- Toolbar
- The toolbar holds the Home button, the message bar (select it to repeat the message), a backspace button and a clear button. Choose where it goes:
- Toolbar top: the traditional position.
- Toolbar bottom: often easier with the touchpad or switch inputs, which place their on-screen controls at each end of the toolbar.
- Full screen: hides the toolbar, so there is no message bar.
- Label position
- Show button labels above the symbol, below it, or not at all.
- Spacing
- The gap between buttons, which also changes how big the symbols appear.
- High contrast
- An experimental setting that adjusts the board for some low-vision users.
- Background and highlight
- The board's background colour, and the colour used to highlight buttons and rows while scanning.
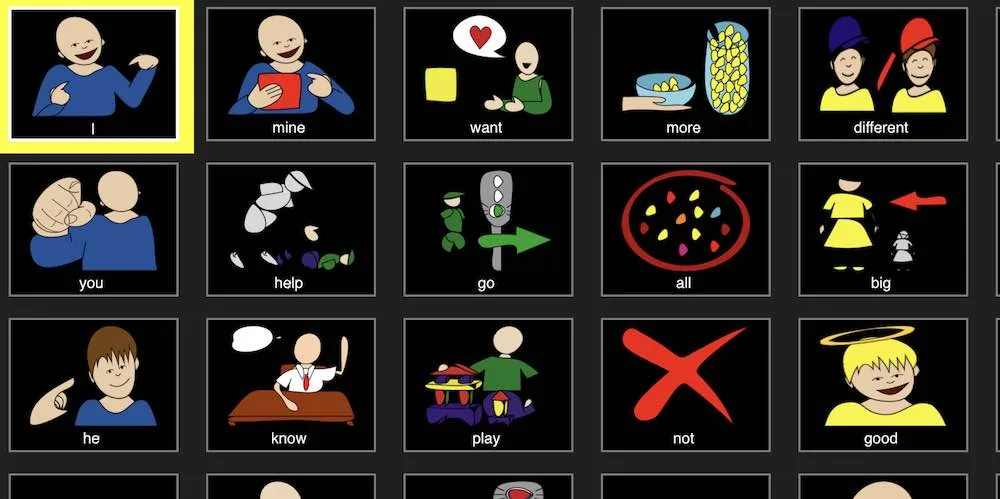
Speech and voices
Choose the text-to-speech voice and language, and set pitch, rate and volume. The voices available depend on your device and operating system.
PiCom normally starts with your device's default voice, so changing the system voice may change PiCom's voice too. On iPad and iPhone, the voice PiCom uses follows Settings › Accessibility › Spoken Content › Voices, which gives you Apple's full range of voices, accents and languages.
You can also choose whether PiCom speaks:
- each button when it is selected
- the name of a new board when a button opens it
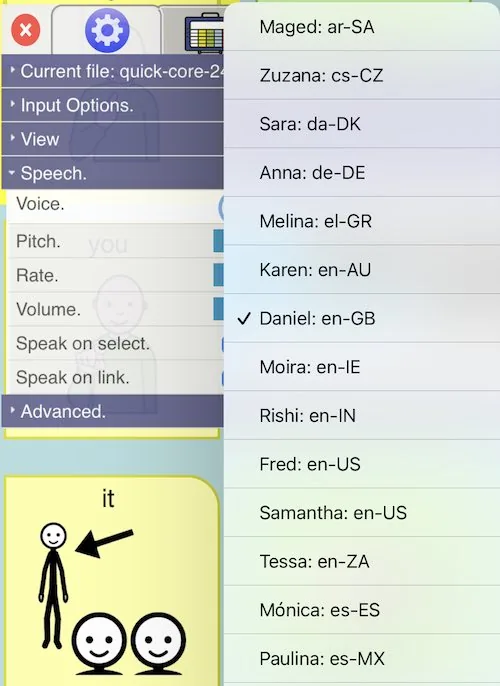
Changing the spoken voice on iPad
Import, export and share
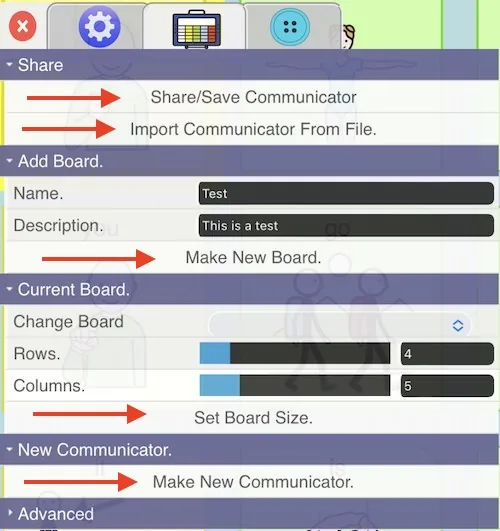
The second Settings tab manages communicators. PiCom works with Open Board Format files: .obz is a set of linked boards with their symbols, and .obf is a single board.
From this tab you can:
- import a board or communicator
- add a new board to the loaded communicator
- add rows and columns to any board
- start a new communicator from scratch
- export or share the communicator as an .obz file
After making a new board, link to it from a button on an existing board using the button editor.
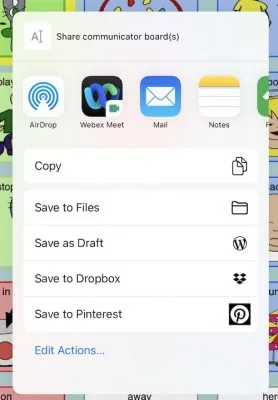
Share sends the .obz file to another device or person, or saves it to your files or a cloud service such as Dropbox. Export saves a copy. The share screen looks slightly different on each system.
Export your communicator after making changes. The .obz file is your backup, and it is how you move a communicator to another device or app, including Sensory Boards.
Button editor
The button editor is the third Settings tab. Turn it on to show it. Use it to change existing buttons or add new ones, with images, symbols, sounds and speech.
Load the board
Open the board that has the buttons you want to change or add.
Open the button editor
Open Settings and switch to the button editor tab.
Go to the button
Use the four arrows, or the keyboard arrow keys. The position shows as column, row: 3,2 is the third column, second row.
Make your changes
Edit the image, colours, label, speech and actions, as described below.
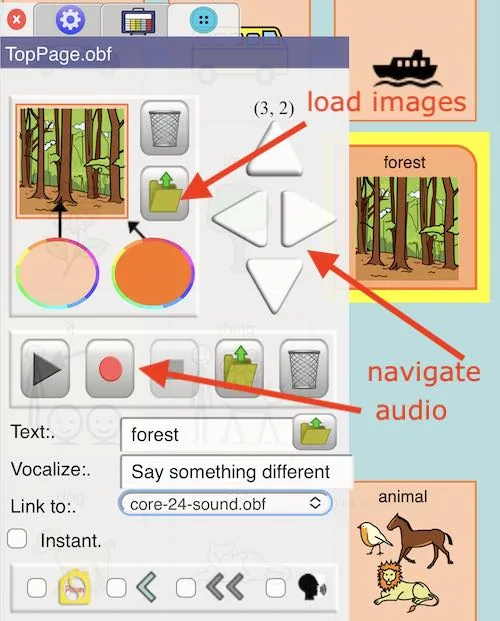
Images and colours
- Replace the image with a symbol, picture or photo from your files. Personal photos can mean more to the user than symbols.
- When you type a label on a new button, a matching symbol from PiCom's 2,000+ symbols may appear automatically.
- Search Global Symbols by entering a label and selecting the Global Symbols icon.
- Change the button's background colour and the frame colour shown when it is selected.
Labels, speech and recordings
- Label: the text on the button. If there is no recording, PiCom speaks the label.
- Vocalise: text to speak instead of the label, when they should differ.
- Record: record a voice for the button, or import an audio file. A recording always replaces text-to-speech for that button.
Button actions
- Instant
- Speaks the button straight away instead of adding it to the message bar.
- Home
- Returns to the top board. Useful in full screen view, where the toolbar's Home button is hidden.
- Delete and clear
- Make the button delete the last word, or clear the whole message bar.
- Speak message bar
- Reads out the whole message, even when the message bar is hidden.
- Link to board
- Opens another board in the communicator.
Languages and translations
Since version 1.0.4, PiCom's interface can be switched to a wide range of languages. Choose one from the drop-down on the board settings tab. These translations are machine-generated from English, so they may contain mistakes. If you can help improve a language, please contact us.
Machine-translated versions of the English templates are also available to download from the PiCom board translations repository on GitHub, which lists every language. To use one:
Download
Download the translated board file for your language.
Import
Open it with PiCom's import function.
Check and edit
Correct any words and symbols as needed.
Save
Export the finished board to keep or share.
Help videos
The PiCom settings playlist has 17 short videos covering the button editor, input controls, view settings, choosing voices, loading templates, adding and linking buttons, hiding the Settings button, grid sizes, switch modes, Global Symbols, and saving and sharing boards.
Open the PiCom settings playlist on YouTube
For installing PiCom from a browser, see the videos on the install page.
Common questions
Is PiCom free?
Yes. PiCom is free for end users and has no adverts. Organisations wanting to redistribute or bundle it should read the licence page.
Do I need an account?
No. PiCom needs no sign-up or login, and it does not track how it is used.
Does PiCom need the internet?
No, not to communicate. Once your communicator is set up, PiCom works offline. You need a connection to download or share boards, search Global Symbols, and get updates.
Which devices does PiCom run on?
iPad and iPhone, Android tablets and phones, Chromebooks, and Windows computers. It also runs in a web browser (Chrome or Edge on Windows, Mac and Chromebook, or Safari on iPad and iPhone) and can be installed from there. See Install PiCom.
Can I use boards made in other AAC apps?
Yes, if they are in the Open Board Format (.obf or .obz). PiCom can import them, and boards you make in PiCom can be exported for other apps.
How do I get back into Settings?
Right-click three times on the top-left button, press Shift + S, or tap the top-left button three times with two fingers. See Opening Settings.
How do I back up a communicator?
Export or share it as an .obz file from the board settings tab, and keep the file somewhere safe. See Import, export and share.